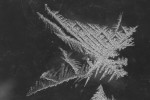
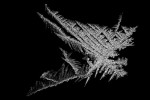
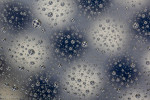
First Attempt, 2011
Back in 2011 I experimented with water droplet photography, by taking some photos of water droplets refracting a group of candy (I think it was M&M’s). It turned out okay except I had some issues. Firstly, getting the water droplets was a pain in the you-know-what! I ended up using a plastic cd case, and was trying to freeze it with water to get the water drops. Needless to say it didn’t work too well, and hours of work wiping off the water and trying again, it really scratched it all up. This is what it looked like:

2011 – Water Droplets
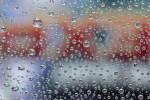
Second Attempt, 2015
So today, a few years later, I attempted it again. This time I obviously wouldn’t use plastic but rather glass. I came across a good video from Mark Wallace and he had a great idea to use rain-x. So I picked myself up a bottle and spent some time snapping some pics. Here’s a gallery of some shots today (these are also on my Flickr Set on Close-Up & Macro Photography):
-
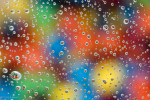
- Water Droplets – M&M’s
-

- Water Droplets – Skittles
-
- Water Droplets – Serenity Badge
-
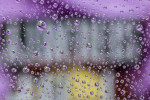
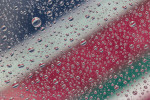
- Water Droplets – Red Colours
-
- Water Droplets – Rain-X
-

- Water Droplets – Next Digital
-
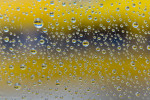
- Water Droplets – Colours
-
- Water Droplets – Calgary Expo
-
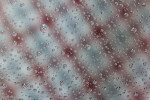
- Water Droplets – Blue Colours
So I definitely learned from the first go around not to use plastic, the glass worked well. But, of course, there are more things I think I learned that I will take into account for next time:
- The water drops continue to evaporate, so sometimes you need to keep spraying. Might have to clean the glass after so often.
- Ideally, it’s best to have the same sized drops, though I don’t think there’s any way you can plan for this. It’s probably best to just shift your camera or glass around to get the best areas of water droplets with the closest-sized drops.
- Get closer. I did experiment with moving my lens closer to the glass, but I wasn’t able to focus on the water drops (must have exceeded my minimum focusing distance). But, being on a tripod it is hard to adjust in smaller increments, so next time I’d probably try inserting a book for example under both sides of the glass, to raise it up higher a little at a time. Alternatively I could actually try using my Kenko extension tubes that I bought but have never got around to trying out. That would allow me to get closer than my minimum focusing distance.
- By getting closer, I think it would look a little more like my 2011 water droplet photo in that you would have larger drops and it would be easier to see the refracted object inside the droplet. Right now, as you move away from the centre of the photo, the drops get blurry and really skewed. Getting closer in I think it would be a lot more centered and concentrated and look a lot better. But that’s for another day.
The Set-Up
- Canon T3i DSLR.
- Canon 100mm L Series Macro Lens.
- Manfrotto tripod with a ball head.
- Table type setup, with glass on top. You put your objects/colours to refract underneath. You spray the water on top (obviously).
- Rain-X. Helps with the forming of the water droplets.
- Remote trigger or cable release. So you don’t bump the tripod/camera and shake it, when snapping the picture.
- Lights. You may need some additional lighting.
- Hotshoe level. This comes in handy for making sure your camera is fairly straight. It is sticking out away from you and can be hard to eye it up otherwise.
-
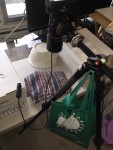
- Setup Picture #1
-
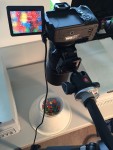
- Setup Picture #2
So as you can see from the previous two photos, the camera is mounted to the tripod ball-head, and the arm is extended out horizontally. It points down over top of the glass where your beads of water is. You want to focus on the refracted object inside the water drops, not on the object itself. You can play around with depth-of-field, but f/2.8 is the best because it renders the object itself out of focus. If you jump up to say f/4, then the object becomes clearer. I took pics of both f/2.8 and f/4, and I liked f/2.8 usually the best. Of course your macro lens may not be able to open up to f/2.8, so if you only have f/4 for example, then go with that. Also, the closer the object was to the glass underneath (propping up the object from the table), then it gets more in focus as well, so depending on the look you are going for, you may have to experiment.
I’ll quickly post some dimensions as well, but really it’s just trial and error and playing around with it:
- The tripod legs were extended and raised the top/centre of the tripod to around 38 inches off of the floor.
- From the centre of the tripod out to the camera mount bracket was around 9.5 inches; and, out to the centre of the lens was around 12 inches.
- The distance from the outer edge of the lens to the top of the glass was around 11 inches; and I also was using my lens hood so the distance from the outer of the lens hood to the top of the glass was around 7.75 inches.
- The distance from the glass to the floor was approximately 23 inches.
- On top of the table, I used different objects (bowls / containers) to elevate the object a bit, and these ranged from about 3 to 7 inches in height.
Comments?
Well, that’s about it for today. Please leave any comments and let me know what you think. If you have a better way of producing consistent water drops, PLEASE let me know in the comments area below.
Thanks for reading… Cory.